DetailsChassis
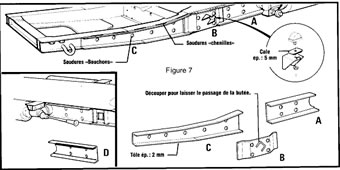
History shows that a rusted chassis will often fail on Raids. Inspect the chassis closely and if there is any indication of rust or deformation replace the chassis.See Figure 7 in the Citroen publication Ici Commence L’aventure, for advice on how to reinforce a chassis. Most new chassis come with the PO reinforcements. If you are not familiar with the problems associated with weakening steel due to welding, refer to a specialist.
Engine and Gearbox Protection Guard
You will need to fit an engine and gearbox protection guard. Experience has shown that the best material for this job is aluminium plate around 3mm thick. The plate needs to attach to each chassis side-rail and extend from the front bumper and terminate in front of the exhaust cross box.
Drill access holes big enough for tools to reach engine mounts, lamp holder bolts, sump plug, drain plug on gearbox.
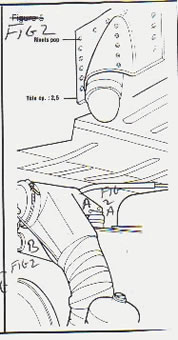
The example above has a polypropylene sheet with steel plate beneath.
Note also that the steel plate extends forward and up to the bumper bar. This worked well to push down the spinifex and keep grass and seeds from the air intake.
Note also the bonnet strap and the rope for pulling out of sand bogs. It is attached with shackles to the towing eyes and tucked into the tray behind the bumper.
Swing Arm Bearings
Every Raid has seen some casualties due to dry, rusted and/or loose bearings.
Clean and regrease or replace the bearings and refit them to original specifications.
Kingpins
The kingpins should be inspected for play and replaced if necessary.
Suspension
The suspension is an integrated system of tyre pressure, shock absorbers and spring pot. If you adjust one, say increase the tyre pressure, you are likely to have a problem in another, in this example a cracked shock absorber mount perhaps. Original specifications are recommended.
Suspension pots
Check the canister for rust. The spring pot mountings are often rusted. All threaded parts should be serviceable and able to be easily dismantled.
Check that the two rubber buffers are fitted to specification.Check knife edge clips and dust boots and secure.
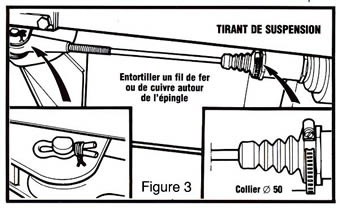
Cut a screwdriver slot into all suspension bolts, at the 10mm end. Should you tear the steering or axle tubes off, you can easily remove the broken bolt, especially on the rear axle.
Vehicle heights should be adjusted according to the manufacturer specifications. Changing the height to compensate for overloading the vehicle is fraught with danger. By shortening the suspension rod, you limit the travel of the arm, so when the arm rises, the spring in the pot compresses before the arm comes in contact with the bump stop. This results in broken rods, mountings being ripped off wheel arms and bent wheel arms.
Shock Absorbers
Shock Absorbers should be new, or as new, and all mountings should be inspected for fatigue cracks.
Weld a brace on to the rear suspension stop and check welding on the pulling points of all arms, we have seen these crack.
Fuel Line
The original black fuel line clips located on the left side chassis rail are often missing or not secured to the chassis. When driving over obstacles the fuel line can be torn off. Accordingly the fuel line should be securely attached to the chassis.
Inspect all rubber hoses for cracks.
Brake LinesBrakes lines should be firmly secured and inspected for cracks and rub marks.
The rear brake pipes on the swing arms are completely exposed. To avoid stones hitting the pipes, fit rubber or plastic sleeves and tape the lines to the swing arms.
Steering
The axle bolts need to be serviceable and tightened to the correct torque, and locked into place with the locking tabs.
All threaded parts of the track rods and track rod ends should be cleaned and serviceable.
Re-grease the tie rod ends and fit new dust boots. Check the ball joint for metal chips and secure the two 7mm bolts on the wheel hub with a lock plate. The 7mm bolts are known to fatigue so they are best replaced. Adjust the front wheels to 0-3mm toe out.
Inspect the steering pinion for play; it is not uncommon to find the pinion bearing worn out. Same for the two steering ball joints behind the gear box, check the anti-rattle rubber between the steering ball joints and the steering track rods.
Rubber Inner Mudguard Holders
To prevent the middle drive shaft boot being ripped, secure the lower inner mudguards in their V shaped rubber holders attached on the chassis and bend the corners slightly away.
Bumpers
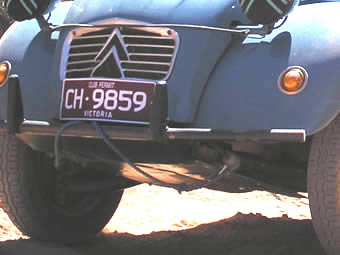
Bumper bars should be secured. The standard rear bumper hangs very low, and an alternate is suggested. All items like reverse lights and fog lights should be removed from under the bumper and refitted above the bumper.
Engine
A complete engine service is recommended before the Raid.
Start with a compression test. It should read from 100 psi to 160 psi with a variation of not more than 10% between the two cylinders. Remove the valve covers and check the 3 main nuts holding the cylinder heads. Adjust the valves to 0.20mm and fit new valve cover seals.
Fit new contact points, condenser, spark plugs and ignition leads. If you have electronic ignition fitted be sure to bring a complete original Citroën points and condenser set including the box, advance weights and fittings. It is likely that the ignition system will be submerged. Clean the oil cooler. Inspect the oil feeding tube on the engine and on both cylinder heads for rust and oil leaks.
Fit new engine mounts; inspect the fan hub for cracks and replace if necessary.
Inspect the fan protective grill for defects and make sure the light grill mesh on the inside of the bonnet is firmly secured to prevent stones and twigs entering the fan cooling shield. Test the engine breather. Change the oils and oil filter.Exhaust
Inspect all inlet and exhaust manifold nuts and exhaust clamps.
Make sure that both mufflers are in good condition and the front muffler is hanging correctly on the two bolts on the gear box.Carburettor
The carburettor should be serviced and adjusted according to original specifications.
Air Filter
The air filter housing is constructed from two parts joined together and should be sealed with a sealant. If the housing is aged and worn replace it.
Secure the goose neck hose connecting the air filter to the carburettor using clamps. If the goose neck is cracked replace it.
Wheel Bearings
Inspect all four wheel bearings for play and noise. Bearings should be re-greased or replaced.
Brakes
Must be in serviceable condition and adjusted to specification. Change the brake fluid.
Tyres
The choice is a point of conjecture.The original tyre is a Michelin 125x15, however the side walls are angled and susceptible to piercing. Michelin 135x15 have proved to be a suitable tyre, however other 135x15 tyres and even 145x15 tyres have performed equally well.
The larger the tyre, the more unsprung weight, and the larger the alteration to engine to wheel ratio.
The single most important factor remains the age of the tyre, not the amount of tread left, but the age of the rubber. New tyres are recommended.Gear Box
Gear box trouble occurs on every Raid. Gearboxes unwind and lock or simply fail. The gearbox should be in serviceable condition.
You should ensure that the gearbox has been re-peened, by approaching your local gear box guru, and avoid unwinding the box.Inspect the lid rubber boot for cracks and secure with cable tie or clamp. Check the two rubber grommets on the gear lever linkage and inspect all bolts, nuts, split pins and washers.
Clutch
If the engine is not in the car, inspect the entire clutch for wear and tear.
While you are there check the spigot bush and seal at the back of the crank shaft and the crank shaft seal behind the fly wheel.
It is best to have the fly wheel professionally machined. Fit a new clutch and clutch cable. Inspect the clutch fork for cracks or bends and replace if necessary.
Electrical
You may think your alternator, starter, regulator and battery are in good condition and have not failed you for years, but now is the time to get your alternator and starter overhauled, and replace your regulator and battery.
2Way Radio
A vehicle-mounted 40 channel UHF CB radio and antenna must be fitted to every car in the Raid.
Some of the sections that we travel have a condition of transit being that each vehicle is fitted with such a radio which operates between 476.25 Mhz and 477.400 Mhz. These are known in Australia as standard UHF radios.
We have seen UHF radios from other countries, which purport to transmit over the same frequency, however the channel spacing is different so it is recommended that you purchase one in Australia.
Handheld UHF radios are useful when you are outside the vehicle and need instructions from someone, however they are optional and additional to the requirement of a vehicle-mounted radio.